Creating simple Android Custom View
You may be wondering why you would ever want to create a custom view. Android comes with many views already, and these views follow behaviors that the user expects and has grown accustomed to (buttons, check boxes, text inputs). These views are fine and work great, but sometimes they do not provide all the functionality that your apps requires, or you may simply wish to build a more customizable component.
Views make it easy to add event listeners, use in the layout editor, and reuse in your current application or even share across projects.
For this tutorial we will be creating a view in which we will draw a rectangle . This view itself may not be extremely useful, but it provides a simple introduction to custom views.
How Android Draws Views
Drawing begins with the root node of the layout. It is requested to measure and draw the layout tree. Drawing is handled by walking the tree and rendering each View that intersects the invalid region. In turn, each ViewGroup is responsible for requesting each of its children to be drawn (with the draw() method) and each View is responsible for drawing itself. Because the tree is traversed in-order, this means that parents will be drawn before (i.e., behind) their children, with siblings drawn in the order they appear in the tree.
Drawing the layout is a two pass process: a measure pass and a layout pass. The measuring pass is implemented in measure(int, int) and is a top-down traversal of the View tree. Each View pushes dimension specifications down the tree during the recursion. At the end of the measure pass, every View has stored its measurements. The second pass happens in layout(int, int, int, int) and is also top-down. During this pass each parent is responsible for positioning all of its children using the sizes computed in the measure pass.
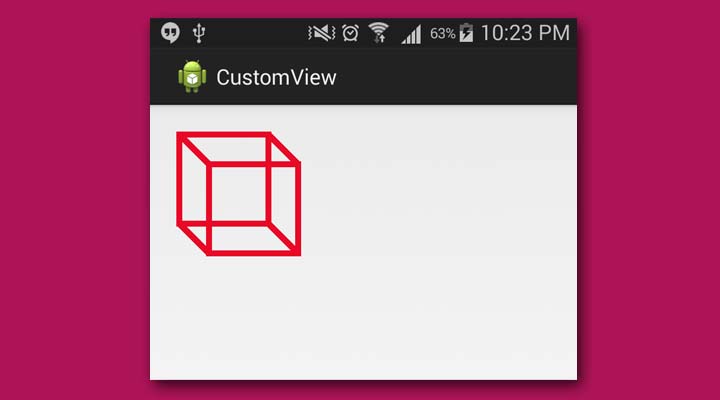
Preview :
Lets get Started :
1. Create new project :
Create a new project File -> New -> Android Project with package name “com.example.customview”.
2. Create Custom view class
create MyView.class inside package “com.example.customview” and copy following code to it.
In this code we have overridden onDraw method which provide a canvas on which we have to draw stuff. in this case we drawn a rectangle and other rectangle beside it and then connected both of them using lines so that it might look like a cube. The paint object used in this is used to add properties like color stroke etc.
|
1 2 3 4 5 6 7 8 9 10 11 12 13 14 15 16 17 18 19 20 21 22 23 24 25 26 27 28 29 30 31 32 33 34 35 36 37 38 39 40 |
package com.example.customview; import android.content.Context; import android.graphics.Canvas; import android.graphics.Paint; import android.graphics.Paint.Style; import android.util.AttributeSet; import android.view.View; public class MyView extends View { Paint paint; public MyView(Context context, AttributeSet attrs) { super(context, attrs); paint = new Paint(); } @Override protected void onDraw(Canvas canvas) { // this is the canvas where you will draw all your stuff paint.setStyle(Style.STROKE); // set style to paint paint.setColor(0xFFE80926); // set color paint.setStrokeWidth(10); // set stroke width canvas.drawRect(50, 50, 200, 200, paint); // draw rectangle canvas.drawRect(100, 100, 250, 250, paint); // draw other rectangle canvas.drawLine(50, 50, 100, 100, paint);// simple line joining edges canvas.drawLine(200, 200, 250, 250, paint); canvas.drawLine(50, 200, 100, 250, paint); canvas.drawLine(200, 50, 250, 100, paint); } @Override protected void onMeasure(int widthMeasureSpec, int heightMeasureSpec) { setMeasuredDimension(400, 300); // set desired width and height of your // layout } } |
3. Adding custom view to activity_main.xml
The MyView.java we created must be visible in custom android views.
Now just drag and drop it into the layout file. After this content of activity_main.xml would be like this.
|
1 2 3 4 5 6 7 8 9 10 11 12 13 14 |
<RelativeLayout xmlns:android="http://schemas.android.com/apk/res/android" xmlns:tools="http://schemas.android.com/tools" android:layout_width="match_parent" android:layout_height="match_parent" tools:context="com.example.customview.MainActivity"> <com.example.customview.MyView android:id="@+id/myView1" android:layout_width="wrap_content" android:layout_height="wrap_content" android:layout_alignParentLeft="true"/> </RelativeLayout> |
There is no need to make any changes in other files.
4. Build and Run
now just build and run the project to see the output.