RIL Notifier for Android: A Complete Overview
Are you tired of missing important phone calls and messages due to poor network connectivity? Say no more! RILNotifier is here to ensure that you stay connected at all times.
In this post, we provide a complete overview of RILNotifier for Android. We’ll cover what it is, how it works, and the benefits of using it. Additionally, we’ll answer some frequently asked questions such as whether it’s safe to use, if it causes battery draining issues or Wi-Fi connection errors, and how to uninstall or stop the app.
We also provide solutions for common problems faced while using the app such as “unable to establish a wireless data connection” error notifications. Read on to learn how you can download and install RILNotifier on your Android device and enjoy seamless network connectivity.
What Is RilNotifier Android App?
RILNotifier is a pre-installed system application found on all Android devices, designed to relay information about the currently connected wireless network type to other apps. It operates in the background, constantly monitoring network connections for changes in internet connectivity.
For instance, if your Android phone switches from an LTE network to a Wi-Fi network, RILNotifier promptly notifies all installed apps on the device of this change in internet connectivity.
- App Name: RIL Notifier (in some Samsung devices, it is named as Service Mode RIL)
- Package Name: com.sec.app.rilerrornotifier
- Developer: Samsung Electronics Pvt. Ltd.
What is RIL in RILNotifier?
RIL stands for Radio Interface Layer and functions as an intermediary layer that interfaces between Android telephony services and radio hardware, specifically ANT Radio. Within the Android architecture, RIL is dependent on other components, namely the RIL Daemon and Vendor RIL.
What is RILNotifier Used for?
RILNotifier serves a specific purpose in the Android ecosystem, and its primary uses are as follows:
- Monitoring Active Internet Connection: RILNotifier is an essential system app that constantly tracks the active Internet connection type to which the Android device is currently connected.
- Background Operation: It operates in the background as a service app, ensuring that it remains active at all times.
- Notifying Apps: Its key function is to notify all the apps installed on the device about the current type of internet connection that should be used for accessing the internet.
- Handling Connection Changes: RILNotifier is particularly adept at detecting any changes in the active internet connection on the device, and it promptly relays this information to apps, ensuring they utilize the updated connection for internet access.
- Seamless Switching: In essence, RILNotifier facilitates seamless switching between different types of internet connections, such as Wi-Fi and LTE, whenever they become available.
- System Integration: This application seamlessly integrates with the Android system, utilizing an internal system to promptly notify other apps about any changes in the network type, ensuring a smooth and uninterrupted internet experience.
What permissions do RILNotifer have?
RILNotifier operates continuously in the background and serves a crucial role in conserving mobile data by automatically transitioning to Wi-Fi networks when available. Importantly, it does not request specific permissions such as access to media, contacts, or call logs. Instead, it relies solely on phone permission. However, in certain situations, RILNotifier may require access permissions to storage.
To verify its permissions:
- Open the Settings app.
- Navigate to Apps.
- Tap the three dots in the upper-right corner.
- Select System Apps.
- Locate the RILNotifier app.
- Tap the Permissions button.
Is RILNotifier Safe?

All pre-installed system apps, including RILNotifier on Android devices, are entirely secure and free from spyware or malware. It’s an Android system app responsible for notifying other apps about network changes and errors, not malware or spyware. Clearing the cache or performing a factory reset can confirm its safety, and it does not monitor calls or pose security risks.
Does RILNotifier Cause Battery Draining?

If you are experiencing battery drain issues with RILNotifier such as “RILNotifier unable to establish a wireless data connection,” there are solutions available. This error message indicates that the phone is unable to access data services. It is important to note that this issue may not be caused by Sprint, as some users assume. However, there are steps you can take to resolve the problem and ensure that RILNotifier is functioning properly. In this article, we have covered everything you need to know about RILNotifier and provided information on whether it is safe or not.
While some users have reported concerns about RILNotifier potentially causing battery drain on their Android devices, there isn’t substantial evidence or proof to definitively link it to significant battery consumption.
It’s important to note that RILNotifier, like other system apps, operates in the background, which can have a minor impact on battery life. If you suspect RILNotifier is affecting your device’s battery performance, you can attempt to force-stop it.
However, it’s essential to consider other factors contributing to battery drain, as RILNotifier typically occupies minimal space and does not usually lead to battery problems on most devices. If a quick battery drain persists, it’s advisable to explore other potential causes and solutions.
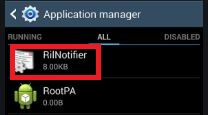
How to Stop RILNotifier?
RILNotifier is a system app that typically cannot be disabled or uninstalled through normal means.
However, if you encounter issues such as excessive battery consumption and wish to halt the app from running in the background, you can force stop it by following these steps:
- Open the Android Settings.
- Navigate to “Apps.”
- Access the Eclipse menu (usually represented by three vertical dots) at the top-right corner and select “Show system apps.”
- Locate and select “RILNotifier.”
- Tap on “Force Stop.”
This action will immediately cease RILNotifier and all associated processes from running until the device is restarted. To be on the safer end, you can also disable the app notification settings to stop notifications from the app that happen because of cellular network issues or connection problems. We have shared the complete process below.
How to correct the Rilnotifier problem “unable to establish a wireless data connection”?

If you are facing the Rilnotifier problem of being “unable to establish a wireless data connection,” there are a few steps mentioned below you can take to resolve it.
Turn your mobile data off and on again
If you receive a connection notification while using mobile data, attempt to resolve the issue by toggling off and then on your mobile data. Keep in mind that turning off the data may require a minimum of five minutes before reactivating it.
Reboot your device

Certain users suggest that restarting the device may offer only a temporary fix for the issue at hand. Nevertheless, it is a recommended step to try, and it is a relatively quick process.
To reboot your phone, press and hold the power button until the restart option appears on the screen, then tap on the restart button to initiate the process.
Update your device’s preferred roaming list (PRL)
Updating the device’s PRL can be an effective solution for resolving mobile data connection issues.
To ensure you have the latest software updates for your PRL, follow these steps:
- Launch the Settings app on your smartphone.
- Navigate to the system’s application updates section.
- If there are any available updates for the PRL, tap on the “Update PRL” option.
- Confirm the update by tapping “OK,” and the update will take effect immediately, rectifying any data connection errors.
Turn the RilNotifier notifications off
The RilNotifier app generates notifications when your device encounters data service issues. While working on a permanent solution, disabling these notifications temporarily can be a helpful step. It’s worth noting that this process is safe, and you can re-enable notifications at your convenience.
Here’s how to disable RilNotifier notifications:
- Open the Settings app.
- Tap on “Permissions and Notifications.”
- Select “See all apps,” and then tap on the ellipsis icon (the three lines) in the top-right corner.
- Choose “Show system apps.”
- From the dropdown list, select “All apps.”
- Scroll down to find “RilNotifier” and use the toggle switch to disable its notifications.
Disable the LTE Band to Solve the System App
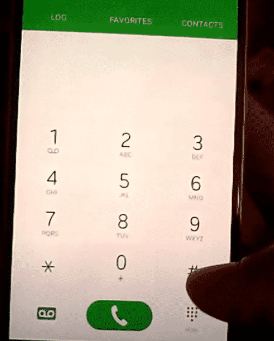
By following this procedure, you can learn how to disable LTE connectivity on a Samsung mobile phone, which may help resolve mobile data access issues:
- Access the dialer option.
- Dial the number ##3282#.
- Upon dialing, a menu will appear.
- Select the “Edit” option.
- Tap on “MSL” and enter the number 000000.
- Press “OK.”
- Navigate to the “Band #” option.
- Disable the mobile device and then reboot it.
After completing these steps, you will notice that the LTE connection is disabled, and your device will operate on the regular phone LTE channel. For more information, consider visiting the Samsung community.
Sprint LTE Frequencies and Bands:
- 850 MHz — Band 26
- 1900 MHz — Band 25
- 2500 MHz — Band 41
Update Device’s Data Profile to Solve the App
At times, neglecting to update your mobile device’s data profile can lead to error messages. To resolve this issue, follow the simple steps outlined below:
- Power off your phone and then power it back on.
- Ensure your phone is connected to a Wi-Fi network.
- Access the settings menu.
- Select “Software Update.”
- Choose “Update Profile.”
- Once the update process is complete, click “OK.”
After updating your profile, reboot your mobile device. You’ll then observe that mobile data is available on your phone, and any associated error messages will be resolved.
Exchange the SIM card
Occasionally, when the SIM card is not inserted into the first slot, it may be unable to receive mobile data because some mobile phones restrict mobile data access to one SIM card slot at a time. To troubleshoot, try disabling the first slot’s SIM card and verify if mobile data access is restored.
If disabling the first SIM card doesn’t resolve the issue, consider swapping the SIM card from slot 1 to slot 2, or vice versa, as needed.
Factory Reset
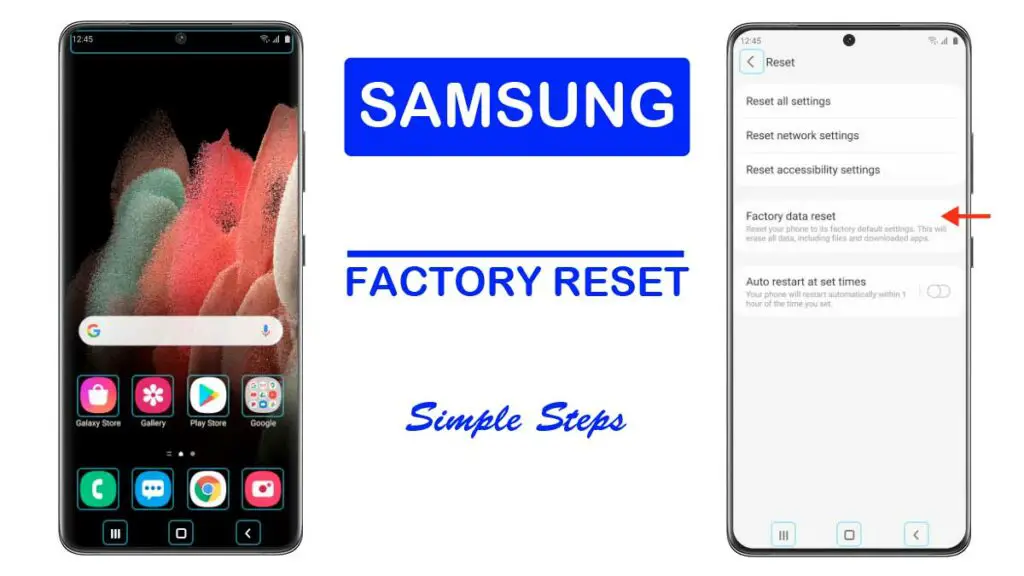
Performing a factory reset is a last-resort solution when persistent issues with Android services arise. This process wipes your device clean, erasing any problematic elements causing disruptions. However, it’s crucial to back up your data before proceeding.
To back up your files, follow these steps:
- Open the Settings app.
- Find and select the “Google” option.
- Choose “Backup.”
- Return to the previous settings page.
- Finally, tap “Backup” to confirm.
If you decide to go ahead with the factory reset, here’s how to do it:
- Launch the Settings app.
- Tap on the “System” menu.
- Select “Reset” and click “Erase All Data.”
- Confirm by choosing the “Erase All Data” button.
Please exercise caution when performing a factory reset, as it will delete all data on your device.
Can I Uninstall RILNotifier?
No, you cannot uninstall RILNotifier as you would with regular Android apps. RILNotifier, along with other system apps, cannot be removed through standard methods, as they perform crucial functions for specific device services. Attempting to uninstall them could potentially disrupt these services and lead to errors.
The only way to uninstall RILNotifier from an Android device is to have root access, which is a risky process and can void your device’s warranty. If you already have a rooted device, you can use a System app remover to uninstall RILNotifier. However, it’s essential to note that RILNotifier is a system app and should not be uninstalled, even if you encounter issues like “Unable to Establish a Wireless Data Connection,” as it plays a vital role in maintaining network connectivity.
How to uninstall RILnotifier?
To uninstall RILNotifier, there are different methods based on device and user preferences. One method is to use ADB commands, while another is to use a system app remover app. Both methods require technical knowledge and may need root access.
Follow specific instructions for successful uninstallation.
Using ADB (Android Debug Bridge)

ADB(Android Debug Bridge) enables you to summon a Unix shell, granting you direct command issuance on your Android device. To use ADB, you’ll require a Windows PC.
Follow these steps:
- Navigate: Settings > System > About phone.
- Tap “Build number” seven times to activate Developer Options.
- Return to main Settings, and open Developer Options.
- Activate USB debugging by tapping it.
- Download ADB onto your PC.
- Unzip the downloaded ZIP file into a designated folder.
- Open the freshly extracted folder.
- While holding Shift, right-click in an empty space.
- Opt for “Open PowerShell window here.”
- Input command:
adb devices. - Proceed to connect your Android device via USB, setting USB mode as File Transfer.
- An on-device USB debugging notification will appear; tap “OK” to permit access.
- Re-enter command:
adb devices. - Your device’s Serial number should now display in the PowerShell window.
- Execute the command:
adb shell pm uninstall –user 0 com.sec.app.rilerrornotifier. - Wait briefly; you’ll observe the app’s removal from your device.
By adhering to these steps, you can effectively utilize ADB to uninstall the RIL Notifier from your Android device.
Using System App Remover

To proceed with this approach, you’ll need to root your Android device. Once root access is achieved, follow these steps to uninstall the system app:
- Download and install the System App Remover application.
- Open the app, locate the RIL Notifier, and mark it by tapping the adjacent checkbox.
- Tap the “Uninstall” button to thoroughly remove the app from your device.
FAQ’s:
Is RILNotifier Used for Hacking?
No, RILNotifier is not used for hacking or spyware attacks. It is a system app found on Samsung Android phones, and there is no known evidence to suggest that it is involved in any hacking or spyware activities.
Does RILnotifier cause a Wi-Fi connection error?
No, RILNotifier does not cause Wi-Fi connection errors on the device. RILNotifier’s primary function is to inform apps about changes in the active internet connection, but it is unrelated to Wi-Fi connection issues.
How does this RILnotifier: mobile data connection error unable to establish a wireless data connection error or notification occur?
RILnotifier is an app that alerts users about mobile data connection errors on Android. The “unable to establish a wireless data connection” error can happen due to signal issues, network congestion, or device configuration problems. RILnotifier provides detailed error messages and troubleshooting tips to help users resolve the issue. If the problem persists, contacting your mobile service provider may be necessary.
Conclusion
In conclusion, RILNotifier is a useful tool for Android users to monitor and manage their mobile data connection. It provides notifications and troubleshooting options for common issues like “unable to establish a wireless data connection.”
While some users may experience battery draining or WiFi connection errors, these can be resolved by following the provided steps such as turning mobile data off and on again, updating device settings, or disabling LTE bands. It’s important to note that RILNotifier is not used for hacking and can be uninstalled if desired.
Overall, RILNotifier offers convenience and support for maintaining a stable and reliable mobile data connection on your Android device.