Android Custom Attributes in View
In this tutorial we will be creating custom view for android with custom xml attributes. This provide users flexibility to control the view from xml layout itself. Users can use android defined attributes but users can also create their custom attributes in custom view.
Most standard views that android supplies are very general, that is, they can be used for many tasks and in many situations. However, in your application it’s often the fact that much code is used to configure these views to specific tasks. This configuration code is often in the activity part of your application and activities can be a real problem to keep clean. Lot’s of different code tends to end up there and it can be hard to refactor into separate classes.
In this tutorial we will be creating a pie chart that will show the percentage in form of pie chart. The concept is to draw a circle in background with some color and then draw pie over that circle using the percentage value entered by the user. We will be entering random values from 0 to 100 automatically with the use of CountDownTimer Class in android.
Creating custom attributes in attrs.xml
First of all create file attrs.xml in res/values folder. This file will be used to declare custom attributes. File attrs.xml looks like this.
|
1 2 3 4 5 6 7 8 9 |
<?xml version="1.0" encoding="utf-8"?> <resources xmlns:android="http://schemas.android.com/apk/res/android"> <declare-styleable name="PieChartAttributes"> <attr name="bgCircleColor" format="color"></attr> <attr name="frontCircleColor" format="color"></attr> </declare-styleable> </resources> |
First we declare a styleable with the name PieChartAttributes . The name can be anything you want, but It’s generally a good idea to name it the same thing as the view that the attributes are going to be used with.
Then we define the actual attribute. We set the name to something descriptive and the format to string. There are many other formats for example “Color”, “Integer”, “Boolean”, “Reference” and so on.
Creating Custom View class
Next we have to create a custom view class named PercentView.java . This class will extend View class of android framework. It must call the constructor
|
1 2 3 4 5 |
public PercentView(Context context, AttributeSet attrs) { super(context, attrs); init(); getStyleableAttributes(context, attrs); } |
There are three constructors available but for now we will need this one only. Here context and attributes associated to that view are passed.
Next we will try to get the custom attributes which are passed in constructor and use them.
|
1 2 3 4 5 6 7 8 9 10 11 12 13 14 15 |
private void getStyleableAttributes(Context context, AttributeSet attrs) { TypedArray attributes = context.obtainStyledAttributes(attrs, R.styleable.PieChartAttributes); String mBgCircleColor = attributes .getString(R.styleable.PieChartAttributes_bgCircleColor); bgCirclePaint.setColor(mBgCircleColor == null ? Color .parseColor("#FF5722") : Color.parseColor(mBgCircleColor)); String mFrontCircleColor = attributes .getString(R.styleable.PieChartAttributes_frontCircleColor); frontPiePaint.setColor(mFrontCircleColor == null ? Color .parseColor("#795548") : Color.parseColor(mFrontCircleColor)); attributes.recycle(); } |
The first line uses the attribute set, attrs, which is a set of all the attributes that exists in the xml file. The method obtainStyledAttributes() does two main things. First, it filters all the attributes in attrs through the context and applies styles and resolves references to values. Second, it only returns the attributes that you specify. These are specified in the second argument which is an array of references to the wanted attributes. In this case R.styleable.PieChartAttributes is an array with only one entry, R.attr.bgCircleColor, which is the attribute we created in the attrs.xml file.
Before getStyleableAttributes() function we have called init() function which initialize all the paint objects. This function is used to do heavy duty work like creating objects. If you do this in onDraw() method then it may cause lag in your UI.
Full PercentView.java looks something like this.
Adding custom view to layout.xml file
Next we have to add this custom view to our activity_main.xml
|
1 2 3 4 5 6 7 8 9 10 11 12 13 14 |
<RelativeLayout xmlns:android="http://schemas.android.com/apk/res/android" xmlns:custom="http://schemas.android.com/apk/res/com.example.percentageview" android:layout_width="match_parent" android:layout_height="match_parent" > <com.example.percentageview.PercentView android:id="@+id/percentView1" android:layout_width="wrap_content" android:layout_height="wrap_content" android:layout_alignParentLeft="true" android:layout_alignParentTop="true" custom:frontCircleColor="#0fff00" /> </RelativeLayout> |
At the root item we’ve added this linexmlns:custom=”http://schemas.android.com/apk/res/com.example.percentageview”
This declares a namespace and enables us to use the attributes we’ve defined in attrs.xml in our layout. In this case we’ve named our prefix “custom” but this could be whatever you want (well, almost). The last part or the URI is the package name of your application.
Here we have used custom:frontCircleColor=”#0fff00″ as our custom attribute. Also name of the view tag will be full qualified ClassName i.e com.example.percentageview.PercentView
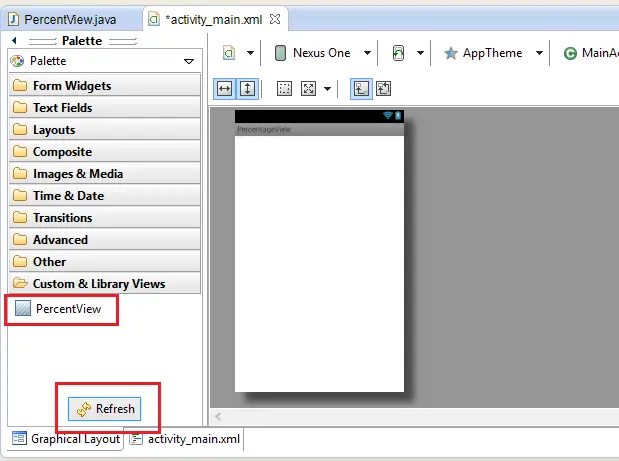
You can also add your custom view to xml using layout editor in eclipse by choosing Custom Layouts in bottom and then dragging and dropping it as shown below.

Linking it all
Now we have created all the files we need to create our view and then handle the pie chart using CountDownTimer.
MainActivity.java looks like this.
|
1 2 3 4 5 6 7 8 9 10 11 12 13 14 15 16 17 18 19 20 21 22 23 24 25 26 27 28 29 30 31 32 33 34 35 |
package com.example.percentageview; import android.app.Activity; import android.os.Bundle; import android.os.CountDownTimer; import java.util.Random; public class MainActivity extends Activity { PercentView pieChart; Random rand = new Random(); @Override protected void onCreate(Bundle savedInstanceState) { super.onCreate(savedInstanceState); setContentView(R.layout.activity_main); pieChart = (PercentView) findViewById(R.id.percentView1); timer.start(); } CountDownTimer timer = new CountDownTimer(30000, 500) { @Override public void onTick(long millisUntilFinished) { pieChart.setPercentage(rand.nextInt(101)); } @Override public void onFinish() { // TODO Auto-generated method stub } }; } |
Here we created PercentView named pieChart and then changed its percentage value using pieChart.setPercentage(rand.nextInt(101)); with the help of CountDownTimer class.
Please comment for any queries.


