Making sure your Pictures are Saved onto your Android phones SD Card
Grab your phone, and take a photo. If you are thinking about where are gallery photos stored on android, the chances are that the image will be saved automatically to your phone’s internal storage, rather than to your external SD card.
If you’ve ever lost photos because of device storage issues, you know how stressful it can be. If you’re like me, you keep your most important photos and documents on the SD Card in your phone. Here are some solutions you can do to make sure your photos are still saved on your SD Card.
Did you know that most Android phones automatically save photos that you take directly to the device’s camera roll? Did you know that you can edit your photos and other files on your Android phone, and save them onto the SD card (or external storage)?
If you’re like me, you probably don’t have more than 15 to 20 pictures on your phone. You just simply don’t have enough space for all those pictures! The best way to free up some space is by transferring your pictures from your phone’s internal memory to a USB Memory Card.
Keeping your phone backed up is important. Because everyone uses an Android phone, the thought of losing all your photos, important contacts, and movies is scary. Read on to learn the best ways to make sure your pictures are saved onto your Android phone’s SD card.
For the latest tips and tricks or to fix any issue with your android smartphone, click here.
Unmount the SD card
Many users often wonder, “What do I do when I can’t access the MicroSD card? How do I mount the SD card? How do I unmount the SD card?” There is only one way to mount and unmount an SD card, and that is through the Settings app. The SD card is just another storage device, like a computer hard drive or USB flash drive, which you can access through the Files app.
Poolside pictures? No more. Unmount those microSD cards before those summer parties start! Before you can unmount a microSD card, you’ll need to make sure that it’s in your device’s storage card slot. Most phones have a slot on the right side of the phone.
Here is a guide that will help you to know What happens when you Unmount the SD card on an Android.
Tap Menu Key
SD cards often take up a lot of space on our mobile devices, and many users forget to eject them when they need to use the device as a tablet, or SD Storage becomes full.
To eject the SD card, you simply need to double-click the SD card icon in the notification bar, and the lock icon will turn to an open circle. Now, if you need to use the SD card on your device, you can access the SD Storage menu, where you can copy files to or move files from the card. Removing the SD card is even easier: just pull the SD card out.
Because SD cards are removable, you can safely eject the card, then put it into your computer, and copy or move files off of it. If you’ve ever run into problems trying to free up space on an SD card, you’re in luck. It’s actually easier than you think, and this can come in handy for any situation.
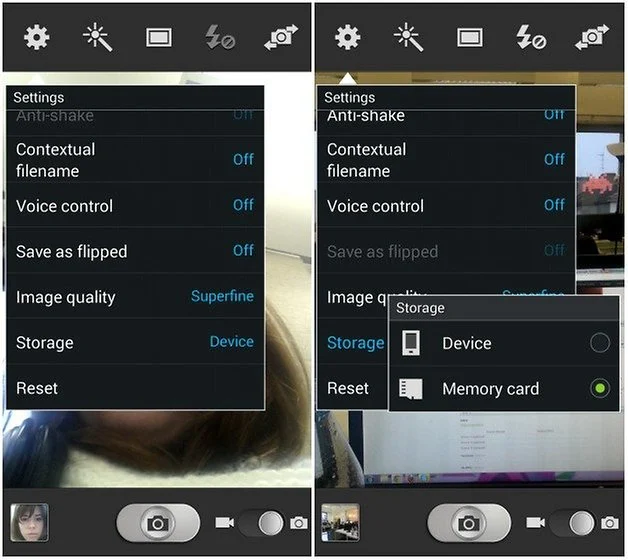
Storage
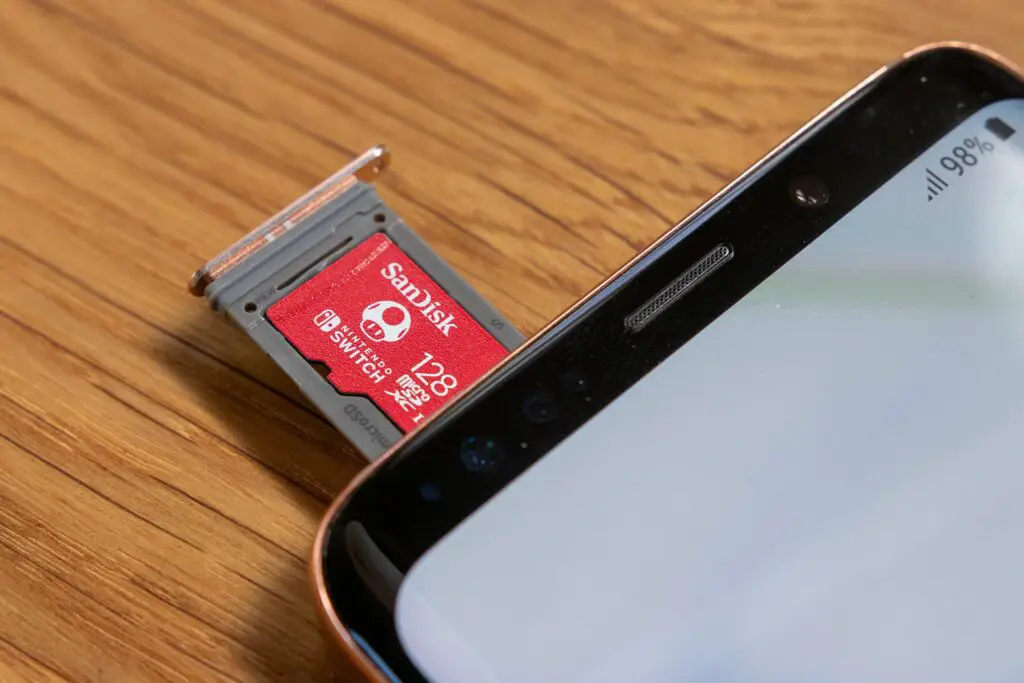
The SD (Secure Digital) card, also known as a MicroSD, is a type of removable flash memory card, used for portable electronic devices. Most modern digital cameras use SD cards to store images, rather than memory chips built into the camera itself.
SD cards can also be used for storage in cell phones, MP3 players, video game consoles, handheld game consoles, GPS units, multimedia players, and digital cameras.
Unmount the SD card
One of the great things about Android phones is the ability to easily mount SD cards for extra storage. However, mounting SD cards can also be problematic. In certain cases, you may need to unmount SD cards to free up space.
The SD card that came with your smartphone or camera is probably pretty small. Even if it isn’t, the standalone SD cards are much smaller than the older SD cards and increasingly smaller as technology advances.
These small SD cards can be very convenient, but if you’re planning on taking a lot of pictures or videos, you may find your SD card is filling up quickly. Luckily, if you have an Android phone, you can unmount your SD card and free up memory.
If you’re dragging along an old Android phone that still has an SD card slot, it’s time to finally stop that habit. The SD card in your phone is too slow, has limited capacity, and isn’t compatible with newer devices anyway. But how do you remove it? It’s not so difficult.
Unmounting an SD card is a quick way to free up space on your device without having to delete files. SD cards store more photos, videos, and documents than most people realize, and if you’re reaching your SD card’s full capacity, you can free up a lot of space by unmounting it.
What memory card might be right for you?

While we’re on the topic of new devices, we’re continuing our memory upgrade coverage. It doesn’t matter whether you’re upgrading an old camera or adding to your phone or tablet’s memory, a new memory card is a great way to get some extra storage. However, there are a few things to consider, including speed, capacity, and card type.
Memory cards are smaller than you think. While you may think of a memory card as a large stick, memory cards are measured in megabytes. A 512 MB memory card can hold thousands of songs, photos, and other files.
Today’s memory cards are small and portable, which allows you to carry them with you on the go. But, with so many memory card options on the market, it’s hard figuring out what card is right for you.
When it comes to memory cards, there are just as many to choose from as there are smartphones and cameras. And choosing the perfect memory card is like choosing the perfect smartphone—it depends on so many factors.
- For instance, how big or small is the memory card you need?
- What type of photography will you be doing?
- How do you intend to use the memory card?
- And, most importantly, how much are you willing to spend?
Checking your media

You probably don’t think about checking your media ad infinitum, but it’s an important habit to get in early. Checking your media means finding any malware that may be lurking on your phone and computer. When you check your phone, don’t download apps you don’t remember downloading. If an app is prompting you to install it, then there’s a good chance it’s collecting some information about you.
The Media Rating Council (MRC)—the organization that sets ratings for video games, movies, and television shows—has lost its credibility. The organization is ad-driven, and it puts its profits over the safety of its consumers.
But as a filmmaker, you have to protect yourself. So, are you making something that is fun, innovative, and exciting? Or something that is mind-numbingly dull, offensive, and morally bankrupt? Before putting your film out into the world, use Media Crash Course to protect yourself from unwanted scrutiny.
How often have you clicked a link or watched a YouTube video only to discover that the content wasn’t what you had hoped it would be? Unfortunately, it happens all the time. That’s because most web media is not safe.
For example, some YouTube video publishers use malware to hide ads that violate Google’s Community Guidelines or that display inappropriate sexual content to kids. And, as with YouTube, some search engines are unsafe. For example, some search results display unwanted and disturbing sexual content, which can result in unwanted attention, peer pressure, or even calls to local law enforcement.
Quick Instructions:
Applications > My Files > External SD > DCIM
Detailed Instructions:
Go to your home page of a phone
The home screen of your phone does a lot more than display wallpapers and widgets. Your home screen can be a powerful educational tool. You can set up shortcuts to the best apps on your phone, like Google Maps or Spotify.
You can also set up shortcuts to your favorite websites or favorite contacts, or even set up shortcuts to important phone numbers. The home screen is a good place to start with your phone since it’s easy to customize.
Before you can do anything with your phone, you need to get to your phone’s home screen. All Android devices have two: the home screen, which is what you see when you first open the phone, and the lock screen, which gives you quick access to your phone’s features.
Go to the Applications Sector of Your phone
Most of the time, people access applications through their phone’s home screen. But there are other applications you can access by swiping left from the home screen. One such application is the Applications folder on my phone. To access the Applications folder, go to your home screen, swipe left, and tap Applications.
Select My Files on Your phone
If you hold your phone in your hand and swipe up from the bottom, you will bring up the menu for your phone. This is where you can view the apps on your device, download new ones, edit apps you have already downloaded, or view your settings (like “Select My Files,” which we will explore later).
If you swipe up from the bottom and then tap “Menu,” you will find yourself in the Settings menu. The Select My Files app is available for free on both iOS and Android phones. It lets you retrieve all your files from your device.
Select External SD on Your phone
Looking for a way to free up space on your phone? Want to boost your smartphone performance? Well, simply press and hold the “SD card” button located at the bottom left of the phone. Then, find the “External SD card” on the main screen. Select “Change SD Card”, and then choose “Change”
Your cell phone has a lot of things in it: a camera, apps, music, videos, pictures, and contacts. But the one thing it doesn’t have is space for that content. (Unless you’re using an SD card.) To expand the storage space on your phone, all you have to do is buy a microSD memory card—a small memory chip that plugs into your phone via a standard USB connection. (For some phones, SD memory cards come already installed.)
- Selecting external SD card on phone.
- Select the USB connection and tap on Allow USB debugging.
- Now, go to settings and then about the phone.
- Click twice on the Build number.
- Now go back to Settings and tap on Developer options.
- Now enable USB debugging.
- Wait for a while and the process will start.
- After a successful connection, you can see the external SD card on your phone.
If you see a DCIM folder click it on Your phone
Click on a folder named “DCIM”. If prompted, enter your password. The DCIM folder is where you store your pictures, videos, and other media files on your phone.
You have seen the prompt for a DCIM folder and wondered what is it. It is a variety of files contained within a Data Compartments Information Management (DCIM) folder. DCIM folders typically contain photos, videos, and other content belonging to users. DCIM folders can be identified by the color of the circle with a gear inside. This circle is found at the bottom-right corner of the DCIM folder.
Tap Camera on Your phone
Who knew you could take a picture with your phone’s camera? Let’s be honest, we didn’t think it was possible. But now, you can. All you have to do is tap the camera icon on your device’s home screen.
Next, you’ll see a square box appear on your screen, which you must tap twice. Once it’s done, you’ll see the classic camera view. Once you’ve taken the picture, you can zoom, rotate, and crop it, and when you’re finished, you can save the photo to your camera roll.
Another Solution
We’ve all been there – we get home after an amazing vacation, and, of course, we want to show all of our friends and family what a great time we had. But, you don’t want to break the bank by buying expensive memory cards so you can keep all of the pictures you take.
Luckily, there is a simple solution to this – just download an app to your Android phone. The app starts automatically each time you plug in your phone to charge, and it will automatically upload any pictures you take.
Does this work? Yes! You simply plug the phone in and the app instantly begins transferring your photos. After you’ve transferred all your pictures, the app will stop working. Do not try to turn the app back on, as it won’t function.
Some Useful Information

Android phones and tablets allow you to store all your apps and pictures on your phone or tablet’s internal storage, but if you want to make the most out of your device, you should store your pictures on your smartphone’s SD card.
That way, you’ll never have to worry about running out of space on your device, and your pictures will look better and be able to be played back much faster than if you stored them just on your phone’s internal storage.
Androids SD cards are particularly useful in saving things like photos or videos. But what happens if your phone runs out of storage space? Luckily, Android’s SD cards are a great place to store files that you might not want to permanently delete from your phone. Here’s everything you need to know to make the most of Android’s SD card.
The Bottom Line
Your Android phone comes with built-in storage, which is referred to as the device’s internal memory. However, if you want more storage, you can insert an SD card into the phone’s slot. The SD card is basically like a hard drive in your computer, where you can save files, photos, videos, and more.
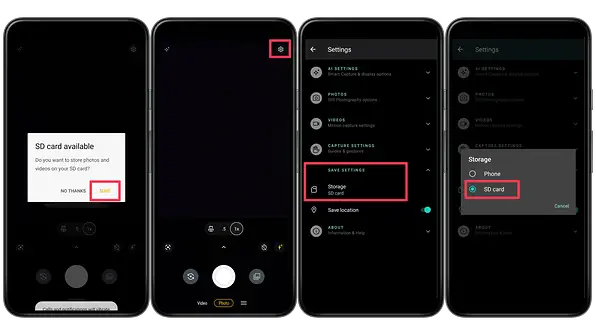
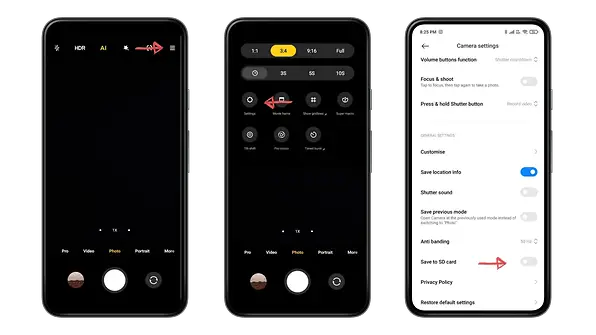
Saving pictures onto your Android phone’s SD card requires the same steps for any other file. Head to your phone’s gallery, then tap the three-dot menu button in the top-right corner of your phone’s screen. From here, select “Save to SD card.”