Transfer Data from Android to Android Wirelessly: Complete How to Guide
Upgrading to a new Android device can be exciting until you realize that you need to transfer all your data from your old phone. The process of transferring data from Android to Android wirelessly might seem daunting, but it does not have to be complicated.
In this blog post, we will guide you through the process of transferring data easily and efficiently, including using built-in transfer tools, third-party apps like Smart Switch and MobileTrans, and manually transferring via SD card, Bluetooth, NFC, and even email. We will also cover the process of Android transfer to ensure that you can transfer data seamlessly between your Android devices.
Additionally, we’ll share the best way to handle your old device once the transfer is complete. Read on to learn how to make the transition seamless and hassle-free.
What to Do Before You Transfer Data
- Charge Both Devices: Ensure that both your old and new Android devices are fully charged to prevent any disruptions during the data transfer process.
- Prepare Old Device: Make sure you have the ability to unlock your old device using a PIN, pattern, or password. This is essential for accessing your data during the transfer process.
- Sign In with Google Account: On your old device, sign in using your Google Account. If you’re unsure whether you have a Google Account, enter your email address to verify. If you don’t have a Google Account, you’ll need to create one. This account will serve as the key for transferring your data.
- Back Up Your Data: Before proceeding, back up your data on the old device. This ensures that your important information, settings, and app data are securely saved. You can learn how to perform a backup using the provided instructions.
- Check Wi-Fi Connection: Confirm that your old device is connected to a Wi-Fi network. A stable Wi-Fi connection is necessary for transferring data efficiently and avoiding any additional data charges.
- Prepare New Device: While setting up your new Android device, you’ll be prompted to sign in with your Google Account. Use the same Google Account that you signed in with on the old device. This is a crucial step for syncing and transferring your data.
- Follow the Setup Process: As you set up your new device, follow the on-screen instructions. During this process, you’ll be given the option to restore your data from a previous backup. Choose this option to proceed with transferring your data.
- Data Transfer: Your new device will detect the backup from your old device associated with your Google Account. Follow the prompts to initiate the data transfer. This will include restoring your app data, settings, contacts, and other relevant information.
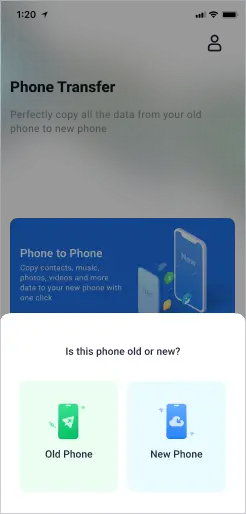
How to Transfer Data from Android to Android
You can choose from a variety of methods to transfer data between Android devices, depending on your device and what you prefer.
Android’s Built-In Transfer Tool
Android’s Built-In Transfer Tool simplifies the process of moving data and settings from an old to a new Android device. Utilizing wireless connections, enables the seamless transfer of contacts, messages, apps, photos, and more, streamlining the device transition and minimizing manual effort. With the ability to sync all your important data, the transfer tool is a must-have for anyone upgrading their Android device.
Here’s a step-by-step breakdown of using Android’s Built-In Transfer Tool:
- Power on your new Android device.
- When prompted, choose the “Start” option to begin the setup process.
- Connect the new phone to a Wi-Fi network to ensure a stable internet connection.
- You’ll be given the option to select which apps and types of data you want to copy from your old device to the new one, such as contacts, messages, photos, and apps.
- Confirm your selections by tapping “OK“.
- Choose the “No cable” option to proceed with a wireless transfer method.
- Opt for the “Backup from an Android phone” method to initiate the transfer.
- Follow the on-screen prompts and instructions to set up the transfer process. This might involve confirming permissions, pairing the devices, and allowing necessary data access.
Smart Switch App (for Samsung)
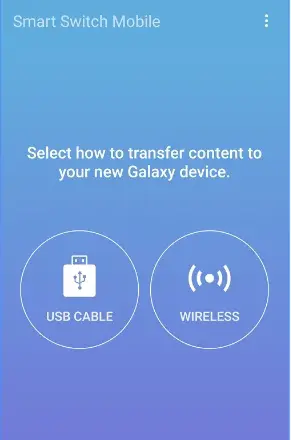
The Smart Switch app, developed by Samsung, offers a seamless and efficient way for users to transfer and migrate data, including contacts, messages, photos, apps, and settings, from their old devices to new Samsung devices. It supports both wireless and cable-based connections, ensuring a smooth transition and simplifying the process of upgrading to a new Samsung smartphone or tablet.
- Install Smart Switch and Charge Phones: Make sure the Smart Switch app is on both phones and they are plugged into chargers.
- Get Close: Put the phones about 4 inches apart.
- Open Smart Switch: Open Smart Switch on both phones. You can find it in Settings under Smart Switch or in the Samsung folder on the Apps screen.
- Old Phone: On the old phone, tap “Send data,” then select “Wireless.”
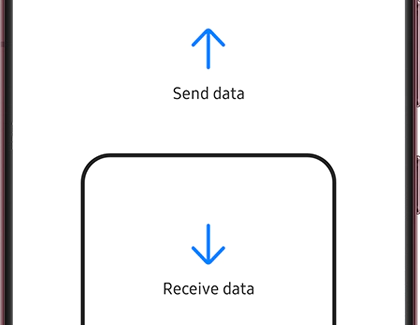
- New Phone: On the new phone, tap “Receive data,” choose “Galaxy/Android,” and then “Wireless.”
- Connect Phones: Allow the connection on the old phone.
- Choose Data to Transfer: On the new phone, select what you want to move, then tap “Transfer.”
- Transfer Complete: After it’s done, tap “Close” on the new phone.
Manually Transfer Data via SD Card
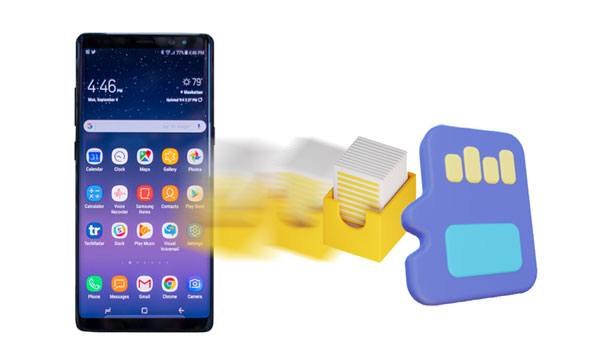
To manually transfer data from your old Android device to the new one using an SD card, you can follow these simple steps:
- Check Compatibility: Ensure both devices (the one you’re transferring data from and the one you’re transferring data to) have compatible SD card slots.
- Backup Data: Before starting, make a backup of your data on the source device (the one you’re transferring data from). This ensures you have a copy in case anything goes wrong during the transfer.
- Insert SD Card: Insert the SD card into the source device’s SD card slot.
- Transfer Data: Using your device’s file manager or a file explorer app, navigate to the files or data you want to transfer. This can include photos, videos, documents, etc.
- Select Data: Once you’re in the appropriate folders, select the files or folders you want to transfer. You can usually do this by long-pressing on an item to enable selection mode, then tapping on other items you want to select.
- Copy or Move: After selecting the files, choose the option to copy or move them. If you choose to copy, the files will remain on the source device after the transfer. If you choose to move, the files will be deleted from the source device after they are successfully transferred.
- Navigate to SD Card: After copying or moving the files, navigate to the SD card’s directory. It’s usually labeled as an “SD card” or “External storage.”
- Paste Data: Once you’re in the SD card’s directory, paste the copied or moved files here. This will start the transfer process.
- Eject SD Card: After the transfer is complete, safely eject the SD card from the source device.
- Insert SD Card into Target Device: Insert the same SD card into the target device’s SD card slot.
- Access Transferred Data: Using the file manager or file explorer app on the target device, navigate to the SD card’s directory. You should find the transferred files or folders here.
- Copy to Device (Optional): If you want the data on the target device’s internal storage, you can now copy or move the files from the SD card’s directory to the desired location on the target device.
MobileTrans – Phone Transfer
MobileTrans – Phone Transfer is a convenient tool for wirelessly transferring data between Android devices. This software offers a wide range of options for data transfer, including contacts, messages, call logs, photos, music, and more. One of the key advantages of MobileTrans is its compatibility with over 8000+ devices, making it a versatile choice for Android users.
Here’s a step-by-step guide on how to use MobileTrans – Phone Transfer to transfer data between two mobile devices:
- Download and Install MobileTrans:
- Go to the official website or app store and download the MobileTrans – Phone Transfer application.
- Install the app on your computer.
- Launch MobileTrans: Open the MobileTrans application on your computer.
- Connect Devices: Use USB cables to connect both your source and target devices to your computer. The source device is the one you’re transferring data from, and the target device is the one you’re transferring data to.
- Select “Phone Transfer” Mode: n the MobileTrans interface, select the “Phone Transfer” option. This will initiate the data transfer process.
- Detect Devices: MobileTrans will automatically detect both connected devices and display them on the screen. The source device will be labeled as the “Source” and the target device as the “Destination.” If they are not correctly identified, you can use the “Flip” button to switch their positions.
- Select Data to Transfer: You will see a list of data types (contacts, messages, photos, etc.) that you can transfer between the devices. By default, all data types are selected. You can uncheck any data type you don’t want to transfer.
- Initiate Transfer: After selecting the data types, click on the “Start” button to begin the transfer process.
- Transfer Process: MobileTrans will start copying the selected data from the source device to the target device. The progress of each data type will be displayed on the screen.
- Completion and Disconnect: Once the transfer is complete, you will receive a confirmation message. You can then safely disconnect both devices from your computer.
- Verify Data: On the target device, navigate to the respective apps or locations (contacts, messages, gallery, etc.) to ensure that the transferred data is available and intact.
- Complete the Process: You have successfully used MobileTrans – Phone Transfer to transfer data between devices.
Transfer Everything via Bluetooth
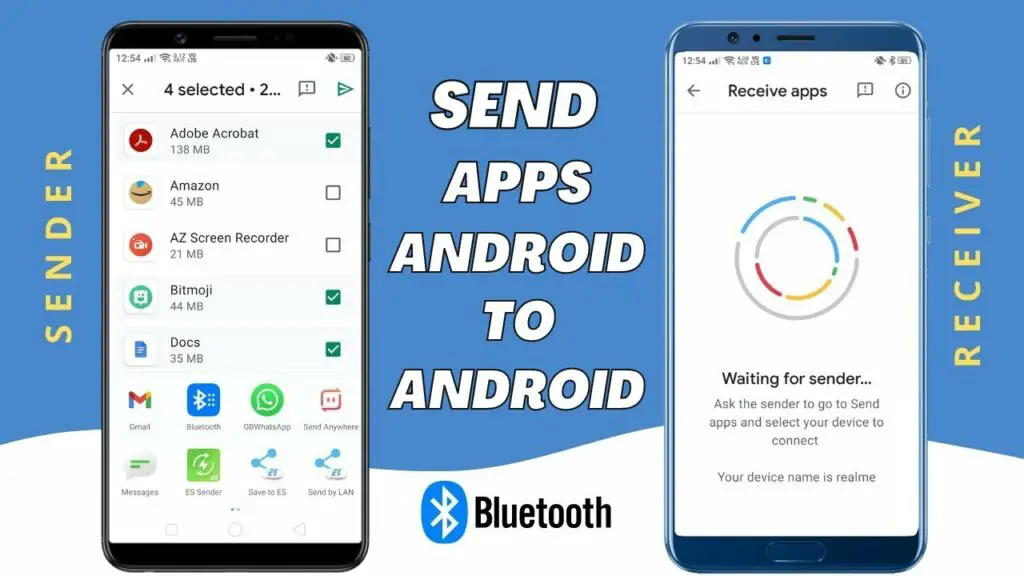
To transfer everything from one Android device to another wirelessly, make sure both devices have Bluetooth enabled. Here’s a step-by-step guide on how to transfer everything via Bluetooth between two mobile devices:
- Check Bluetooth Compatibility: Make sure both devices have Bluetooth capabilities and are turned on.
- Pair the Devices:
- On the source device (the one you’re transferring data from), go to its Bluetooth settings.
- Scan for available devices and select the target device (the one you’re transferring data to).
- Follow the prompts to pair the devices. You might need to confirm a passcode on both devices to establish a secure connection.
- Enable Visibility (if needed): Some devices require you to make them “visible” to other devices during the pairing process. Follow the on-screen instructions to enable visibility.
- Select Data to Transfer: On the source device, navigate to the data you want to transfer. This could include photos, videos, contacts, files, etc.
- Initiate Transfer:
- Depending on the devices and their operating systems, the steps for initiating the transfer might vary: For photos and files: Locate the file, select it, and choose the “Send via Bluetooth” or similar option.
- For contacts: Go to your contacts, select the contact(s), and choose the “Send via Bluetooth” option.
- For other data: Check if there are Bluetooth sharing options available in the respective apps (messages, notes, etc.).
- Select Target Device: A list of paired devices will appear on the source device. Choose the target device you paired earlier.
- Confirm Transfer on Target Device: The target device will receive a notification or prompt asking to accept the incoming Bluetooth transfer. Accept it.
- Complete Transfer: The transfer process will start. Depending on the size of the data, it might take a while.
- Verify Data on Target Device: Once the transfer is complete, navigate to the appropriate apps or locations on the target device to ensure that the transferred data is available and accurate.
- Disconnect and Finish: After successful transfer, disconnect the devices from Bluetooth to ensure a secure connection.
Author’s Note: Try to avoid using bluetooth as it is very slow and has a lower success rate compared to the other methods described in this article.
Try SHAREit to Copy All Data
Here’s a step-by-step guide on how to use SHAREit to copy all data, including text messages, between two mobile devices.
- Download and Install SHAREit:
- Go to your app store and download the SHAREit app on both devices.
- Install the app on both devices.
- Launch SHAREit: Open the SHAREit app on both devices.
- Select Source and Target:
- On the source device (the one you’re copying data from), tap “Sender.”
- On the target device (the one you’re copying data to), tap “Receiver.”
- Connect Devices:
- Share it will automatically create a Wi-Fi hotspot on the source device.
- On the target device, connect to this hotspot from your Wi-Fi settings.
- Pair Devices: The devices will pair automatically via the hotspot connection.
- Select Data to Transfer: On the source device, select the data types you want to transfer. Share it supports a wide range of data, including contacts, messages, apps, photos, videos, and more.
- Initiate Transfer: Once you’ve selected the data types, tap “Start to copy” or a similar option.
- Transfer Process: Shareit will begin the transfer process. The time it takes depends on the amount of data you’re transferring.
- Completion and Verification:
- Once the transfer is complete, you’ll receive a notification on both devices.
- On the target device, navigate to the appropriate apps or locations to verify that the transferred data is available and accurate.
- Finish and Disconnect: After confirming the data transfer, you can disconnect both devices from the hotspot connection.
- Ensure Data Integrity: It’s a good practice to manually check and verify transferred data on the target device, especially for critical items like contacts and messages.
Turn on NFC to transfer data
To transfer data from one Android device to another wirelessly, you can turn on NFC (Near Field Communication) on both devices.
Here’s a step-by-step guide on how to use NFC (Near Field Communication) to transfer data between two mobile devices:
- Check NFC Compatibility: Ensure both devices have NFC capabilities and NFC is enabled on both devices.
- Enable NFC:
- Go to the device settings on both devices.
- Look for “NFC” or “Near Field Communication” in the settings menu and turn it on.
- Select Data to Transfer: On the source device (the one you’re transferring data from), navigate to the data you want to transfer. This could include contacts, photos, files, and more.
- Initiate Transfer:
- Depending on the devices and their operating systems, the steps for initiating the transfer might vary: For photos and files: Locate the file, select it, and choose the “Send via NFC” or similar option.
- For contacts: Go to your contacts, select the contact(s), and choose the “Send via NFC” option.
- For other data: Check if there are NFC sharing options available in the respective apps (messages, notes, etc.).
- Device Pairing: Bring the two devices close to each other, making sure their NFC areas are touching or nearly touching.
- Data Transfer Confirmation: A notification or prompt will appear on both devices, asking if you want to accept the incoming NFC transfer. Accept it on the target device.
- Transfer Progress: The devices will establish a connection, and the data transfer will begin. The progress will be displayed on the screen.
- Transfer Complete: Once the transfer is complete, you’ll receive a notification on both devices.
- Verify Data on Target Device: On the target device, navigate to the respective apps or locations to ensure that the transferred data is available and accurate.
- Disable NFC (Optional): After the transfer, you can turn off NFC on both devices for security and battery-saving reasons.
Use Email to Transfer Photo/Music Between Phones
To transfer photo/music between phones wirelessly, you can conveniently use the email method.
Please note that depending on the size of the photos or music files, sending them via email might have limitations due to email attachment size restrictions. If the files are too large, you might want to consider using other methods, such as cloud storage services, Bluetooth, or dedicated file transfer apps. Always ensure you have the necessary permissions to share the content you’re transferring.
What to Do with Your Android Device After You Transfer Data
It’s easy to get caught up in the excitement of a new phone and forget about the old one. Yet, your old device still holds onto your information until you remove it. Once you’ve moved all your stuff to the new phone, make sure to wipe your old device clean and reset it to its original state. This is especially important if you’re thinking of selling it.
Our smartphones store a lot of personal stuff, like where we’ve been, what we’ve looked up online, and how we spend our money. People often keep important things like passwords, banking details, and private stuff on their phones too. To keep your personal things safe from prying eyes and online crooks, we suggest using a VPN on your new Android phone you purchased from a manufacturer. This way, you’re adding an extra layer of security.
Conclusion
In conclusion, transferring data from one Android device to another can be a seamless process with the right tools and techniques. Whether you choose to use the built-in transfer tool, a dedicated app like Smart Switch, or even manual methods like using an SD card or Bluetooth, there are plenty of options available to suit your needs.
Once the data transfer is complete, don’t forget to take care of your old Android device by wiping it clean or donating it to someone in need. By following these steps, you can ensure a smooth transition between devices while keeping all your important data intact.